
Making your own glow in the dark rocks is a fun and easy project that can be enjoyed by people of all ages.
You might want to make some glow in the dark rocks because you’re looking for a new way to decorate your room. Maybe you’re throwing a party and want some cool centerpieces, or you just think they’re really cool and want to have them around your house. No matter what your reason is, we’re going to show you how to make these rocks yourself!
What you need to make glow in the dark rocks
To make the rocks, you will need:
– Glow in the dark paint or spray (depends on the rock size)
– Paintbrush
– Rocks
– A tarp/newspapers or anything else to protect your work surface
– Clear sealant (optional)
How to make glow in the dark rocks
Selecting the Rocks
The best rocks to use for this project are ones that are smooth and have a good surface area. You want to make sure the paint will be able to adhere well to the rocks.
No matter the size, you can use glow in the dark paint on any rock. Just keep in mind that it’s better to uses a paint spray for bigger rocks and a brush for smaller ones.
Preparing the Rocks
Once you’ve selected your rocks, wash and dry them thoroughly. You don’t want any dirt or debris to interfere with the paint adhering to the rocks.
Picking the Paint
When it comes to choosing glow in the dark paint, it’s important to keep in mind that there are different types of glow in the dark paint, and each type has its own advantages and disadvantages.
The most common type of glow in the dark paint is phosphorescent paint (glow in the dark paint). This paint needs to be “charged” by being exposed to light before it will glow in the dark. The advantage about this type of paint is that it can continue to glow for a long time after it’s been charged.
Another type of glow in the dark paint is fluorescent paint (blacklight paint). This paint does not need to be charged before it glows and will start to glow as soon as it’s exposed to UV light (ex. blacklight). The advantage of this type of paint is that it’s easy to get it to glow bright, but the disadvantage is that it will only glow as long as it’s exposed to UV light.
A final consideration when picking paint is whether you intend the rocks to be displayed indoors or outdoors. If they will spend any time outside, only purchase paints rated for outdoor use.
Preparing the surface
Once you’ve selected and prepared your rocks, it’s time to prepare the surface you’ll be painting on. If you’re working with a large rock, you might want to set up a tarp or newspaper to protect your work surface.
Painting the Rocks
Begin by painting a base coat of the glow in the dark paint. You may need to apply a few coats in order to get good, even coverage. Make sure to let the paint dry completely between each coat. Once you’re satisfied with the coverage, let the paint dry completely. This can take anywhere from a few hours to overnight.
If you’re using spray paint, make sure to shake the can well before you start spraying. You might also want to do a test spray on a piece of paper to make sure the paint is coming out evenly.
*Make sure to follow any specific instructions that come with the paint you have.
Sealing the Rocks (optional)
Once you’re done painting the rocks, you may want to seal them with a clear sealant. This will help protect the paint and make the rocks more durable.
charging the rocks
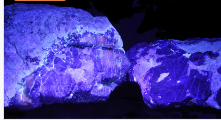
Your rocks are now ready to use! In order to make them glow, you’ll need to “charge” them first. This can be done by exposing them to light for a few minutes. The longer they’re exposed to light, the longer they will glow. Once they’re charged, you can turn off the lights and enjoy your glowing rocks!
Tips for painting rocks with glow in the dark paint
Here are a few things to keep in mind in order to get the best results:
- If you want your paint to really stand out, use a white stone. If you’re using a darker stone, give it a white matte base coat first.
- Make sure the rocks are clean and dry before painting. Any dirt or debris will interfere with the paint adhering to the rocks.
- It’s best to use a paint spray for bigger rocks and a brush for smaller ones.
- Apply a few coats of paint for good, even coverage. Make sure to let the paint dry completely between each coat.
- Using UV light will make the rocks glow brighter and for a longer period of time.
Ideas for using your new glowing rocks
Glow in the dark rocks can be used for a variety of different things. Here are just a few ideas:
- Glow in the dark stepping stone path in your garden.
- Use them as party decorations. They make great centerpieces or accent pieces.
- Get creative and use them for other things, like jewelry or garden decorations.
- Give them as gifts. They make great presents for kids and adults alike!
No matter how you use them, glow in the dark rocks are sure to add some fun and excitement to your life!
FAQ
How long does it take for the paint to dry?
It usually takes about an hour for the paint to dry completely. However, you may need to apply multiple coats of paint, so make sure to allow enough time between each coat.
Can I use any type of rock?
Yes, you can use any type of rock for this project. Just keep in mind that smooth rocks with a good surface area will be the easiest to work with.
What is the best way to apply the paint?
For small rocks, a paintbrush will work fine. For larger rocks, you may want to use a paint sprayer.
Do I need to seal the rocks?
No, you don’t need to seal the rocks unless you want to. However, sealing them with a clear sealant can help protect the paint and make the rocks more durable.